

So, you want to build a dog training obstacle course like the one you saw on your favorite dog show, but you don’t want to break the bank. Don’t worry. You don’t need professional-grade equipment or a massive budget to create a fun, functional agility course right in your backyard. With a bit of creativity (and maybe a trip or two to Lowes), you can create everything from jumps to tunnels using inexpensive materials. Bonus: your dog won’t care if it’s not competition-certified. They just want to have fun with you!
How to Build a Dog Training Obstacle Course on a Budget
Let’s break down how to build a dog obstacle course that keeps your pup challenged, entertained, and safe—without breaking the bank.
This post contains affiliate links. If you buy anything through these links, DogVills earns a commission at no extra cost to you.
Jump Bars
This is one of the key parts of a dog training obstacle course. When building a jump, you want to make sure it is collapsible, as you don’t want your dog to jump into something solid and get injured. You are working on his agility not seeing how many vet visits you can handle in a month!
How to make it:
- Pick up PVC pipes and T-joint fittings (also called “C-cups”) from any hardware store.
- Assemble two upright stands with horizontal poles across.
- Make it adjustable so you can raise the bar as your dog gets more confident—just don’t go too high too fast!
- Use lightweight PVC so it won’t hurt your dog if they accidentally knock it over.
Budget tip: Skip the fancy glue—leave your PVC joints loose so you can easily disassemble and store them.
Check out the video below for tips on how to make agility hurdle jumps out of PVC.
Weave Poles:
The most inexpensive way to do this is with orange traffic cones. They are easy to pick up and store and you can change up the pattern as you wish! These tend to be bigger than what is used in agility training, but they work well if you are just starting or are casually training your dog for fun. For more advanced pups, you may want to go with option 2, though.
Option 1: Traffic Cones
- Super easy and versatile.
- Grab 6–10 cones from a hardware or dollar store and space them out in a line.
- Great for beginners since you can widen or narrow the gaps as needed.
Pro Tip: You’re not trying to stop traffic on a windy day here, so it’s totally okay to go with the cheapest traffic cones you can find. These from Amazon may not be the fanciest, but they’re super affordable:
These 7" traffic cones are perfect for sports training or outdoor dog games. They're designed for use on any surface - grass, concrete, gym floors, cement, and more. Plus, at 7.0" height x 5.31" diameter, 0.10 lb weight, they're easy to take anywhere.

Option 2: DIY PVC Poles
- Stick PVC rods into the ground with rebar or garden stakes.
- Line them up about 24 inches apart for a more “authentic” weave experience.
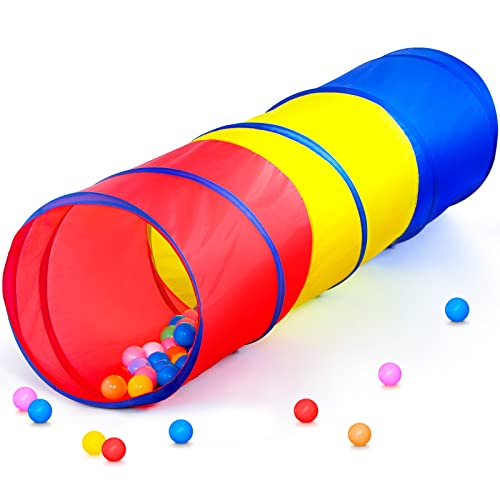
Tunnels:
This is one that you can’t really DIY from start to finish. Well, you could I guess, but honestly, it’s easier to just buy something that’s already done.
Here’s a money-saving tip, though: you can just use a sturdy child’s play tunnel (like the one below). They’re basically the same thing as tunnels marketed towards dog agility courses but cost up to 50% less. Plus, you can often find them at yard sales or on Facebook freebie groups.
Designed with safety in mind, the kid friendly features include: round corners, durable stitching and safe material. Perfect for indoor or outdoor play! It's also easy to clean, just use a damp cloth and mild soap. Folds up flat when not in use!
A-Frame or Climbing Ladder
You can create this with 2 pieces of plywood and a few pieces of smaller wood (smaller than a 2×4) for the steps. Just make sure there are no chances of splinters you don’t want to pull them out of Fido’s paws!
How to DIY:
- Use two sturdy plywood boards joined at the top to form a triangle.
- Nail thin wooden slats (no splinters, please!) horizontally along the boards for traction.
- Keep the incline gentle and stable—no need to go full Everest here.
Alternative:
Repurpose an old toddler slide or ramp. Dogs love the climb and descent, and you don’t have to build from scratch. Chances are you can find one at a yard sale for very little money. If not, you can also buy a brand-new toddler slide for less money than a dog agility slide but just make sure you pay attention to the weight limit and dimensions.
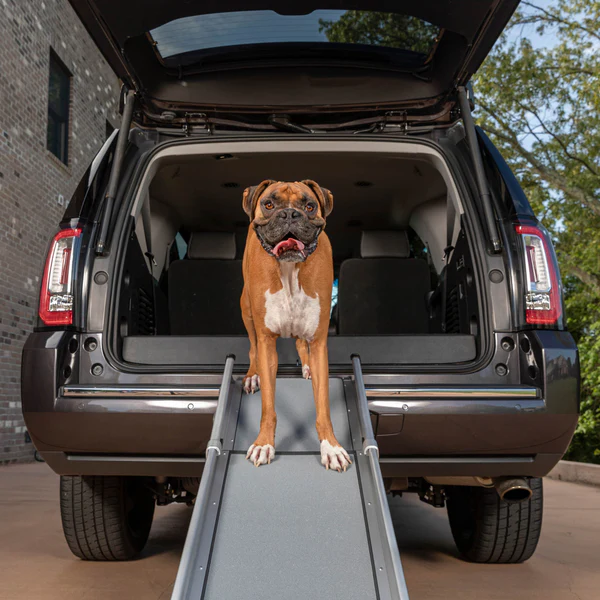
Honestly, the ramp/ladder has the most potential to cause injury if it’s not made correctly, so this is a good spot to splurge if you’re not totally confident that you can make it yourself. Save money by going with a multipurpose ramp, like this one by PetSafe:
If your dog needs a ramp to climb into the car, but you don’t have a lot of cargo area to store one, the Happy Ride® Compact Telescoping Dog Ramp is the perfect solution for both of you. Because this ramp is made of 3 sections instead of 2, it collapses down to 28 in (in contrast to our standard telescoping ramp which collapses down to 39 in). Customize the length of the ramp, based on the size of your vehicle, by extending it anywhere from 28-70 in.
Balance Beam
Want to help your dog build better balance and coordination? A balance beam is a simple but powerful tool to add to your DIY course. It encourages focus, core strength, and body awareness—all while giving your pup something new to master.
Simple setup:
- Start low to the ground and supervise closely.
- Use a wide wooden plank (at least 6″ across) and raise it slightly off the ground with bricks, cinder blocks, or short wood blocks on each end.
- Sand it down to remove any rough edges.
Check out the video below to see what it should look like”
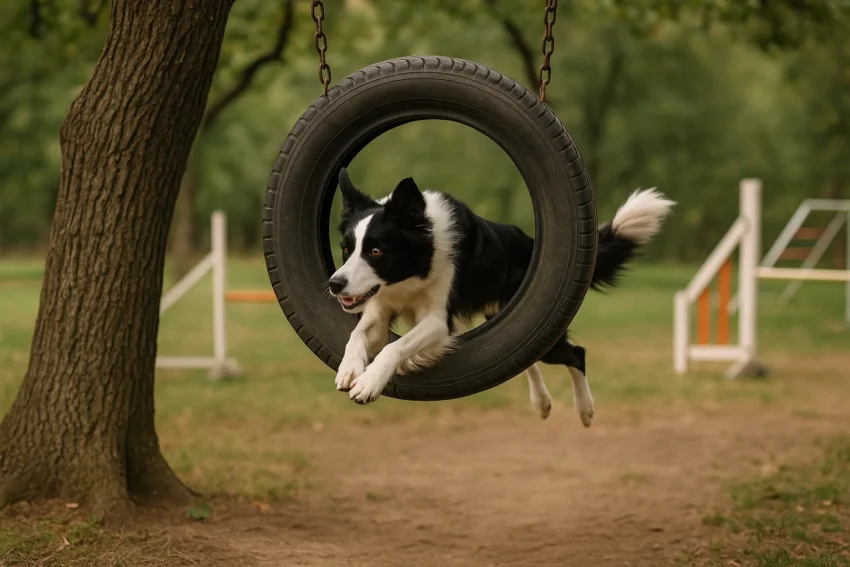
Tire Jump
This eye-catching obstacle adds a bit of flair and fun to your course. Tire jumps encourage your dog to gauge height and space while building confidence with mid-air movement. Plus, it just looks cool.
What you need:
- An old bike or car tire (cleaned and de-scented) or a hula hoop.
- Suspend it from a sturdy frame or between two chairs using rope or bungee cords.
- Make sure it’s low enough that your dog can comfortably hop through without straining.
Safety tip: Always ensure the hoop breaks away easily or swings freely to avoid injury.
Pause Table
Agility isn’t just about speed—it’s also about control. A pause table teaches your dog how to slow down, stop, and follow commands in the middle of all the excitement. It’s a great opportunity to reinforce “sit,” “stay,” or “down” behaviors.
DIY version:
- Use an old coffee table, step stool, or build a platform from wood.
- Add a non-slip mat or rubber drawer liner to keep it safe and secure.
- Make sure it’s sturdy and low enough for your dog to hop on without straining.
Option 2:
Just use a plain old mat, small rug, or even a towel! Seriously, you don’t have to get fancy with this one. Check out the video below to see how they did it.
Quick Shopping List (Budget Style)
You can build almost everything from these low-cost items:
- PVC pipes (¾” or 1” diameter)
- T-joint connectors and elbows
- Traffic cones or garden stakes
- Hula hoops or old tires
- Plywood and slats
- Rebar for anchoring poles
- Sandpaper (for safety)
- Zip ties and duct tape (because, of course)
Where to look:
- Hardware stores like Lowe’s or Home Depot
- Dollar stores and yard sales
- Facebook Marketplace or local buy/sell groups
- Repurpose old household items!
Tips for Success (Without Stress)
- Start small: Don’t overwhelm your pup (or yourself!) with too many obstacles at once. Master one before adding another.
- Reward generously: Treats, toys, and enthusiastic praise will go a long way.
- Train in short bursts: Keep sessions fun and under 10–15 minutes. Boredom is the enemy of learning.
- Be patient: Every dog learns at their own pace. The goal is fun and bonding, not perfection.
Final Thoughts: You Don’t Need a Big Budget to Build Big Fun
Building a backyard dog obstacle course on a budget isn’t just totally doable—it’s actually really fun. Whether you’re training for agility or just giving your dog some mental stimulation and exercise, this is a great way to bond and build confidence together.
Plus, it’s endlessly customizable. As your pup masters each new obstacle, you can expand, upgrade, or reconfigure your course with ease. Before you know it, you and your dog will be the stars of your own backyard dog show.
So grab those pipes, set up some cones, and let the training adventures begin!
Have you ever built a dog training obstacle course? What sort of things did you use? Share with us below!


